05: Programmable Electronics
Assignment
Program a microcontroller to produce an output using at least one button for input. Include a conditional statement and a for loop.
Using Arduino’s "Button" Program
Using Arduino’s example "Button" program, I was able to create a circuit similar in functionality to the transistor circuit I made in session 2. Instead of pressing a button to activate an LED, I wired the circuit so that pressing a button turns off an LED instead. This can be done using a "pull-up" resistor configuration as opposed to a "pull-down" configuration.
Controlling the Soft Gripper
I combined this setup with the transistor circuit I made from session 4 so that I can activate the soft gripper by pressing a button, and shut off air current to the gripper by pressing another button (even while the first button is still pressed). The idea was to create a safety mechanism for the gripper that would shut off its own air intake after sufficient air was pumped in, and the second pushbutton would be substituted for something like a pressure sensor placed on one of the "fingers".
Creating a Time-Based Shut-Off Mechanism
To satisfy the requirements for this week’s assignment, I made an even more advanced safety shutoff mechanism for the soft gripper using two of the inputs on the Arduino Nano. Every moment the air pump pushbutton is pressed, "time" is accrued in the Arduino program and stored as an integer value. This accruement can be paused at any time, and will resume when the pushbutton is reactivated, up until the time value reaches 1500. After 1500, the pushbutton will no longer activate the air pump, and the time counter will only reset to zero after a different pushbutton is pressed, which activates the pressure release solenoid valve.
For now, I substituted the air pump and pressure release solenoid with two blue and yellow LEDs, because I popped the soft gripper I do not yet have the parts to make the pressure release mechanism. The blue LED represents air feeding into the soft gripper, while the yellow LED represents air leaving the pressure release valve.
As you can see, the air pump does not need to be activated continuously; it can be activated in short bursts, up until the counter reaches 1500, and the air pressure can be released at any time to reset the counter to 0.
const int buttonPin = 2;
const int ledPin =  13;
const int releaseLedPin = 4;
const int pressureReleasePin = 3;

// variables
int buttonState = 0;         // pushbutton status
int elapsedTime = 0;
int pressureRelease = 0;

void setup() {
  pinMode(ledPin, OUTPUT);
  pinMode(releaseLedPin, OUTPUT);
  pinMode(buttonPin, INPUT);
  pinMode(pressureRelease, INPUT);
  Serial.begin(9600);
}

void loop() {
  buttonState = digitalRead(buttonPin);
  pressureRelease = digitalRead(pressureReleasePin);
  buttonState is HIGH:
  if (buttonState == HIGH) {
		// **********Check to see if time has reached 1500*******
		if (elapsedTime <= 1500) {
      digitalWrite(ledPin, HIGH);
      elapsedTime = elapsedTime + 1;
    } //If reached 1500, shut off power
    else {
      digitalWrite(ledPin, LOW);
    }
  }
  else {
    digitalWrite(ledPin, LOW);
    if (pressureRelease == HIGH) {
			// *******If pressure released, reset timer********
			elapsedTime = 0;
      digitalWrite(releaseLedPin, HIGH);
    }
    else
      digitalWrite(releaseLedPin, LOW);
  }
  Serial.println(elapsedTime);
}
Designing a Miniature Air Tank in Fusion 360
By using the circle, extrusion, sphere, and hole tools, I was able to create this simple design for a miniaturized air tank in Fusion 360 (.stl can be downloaded here):
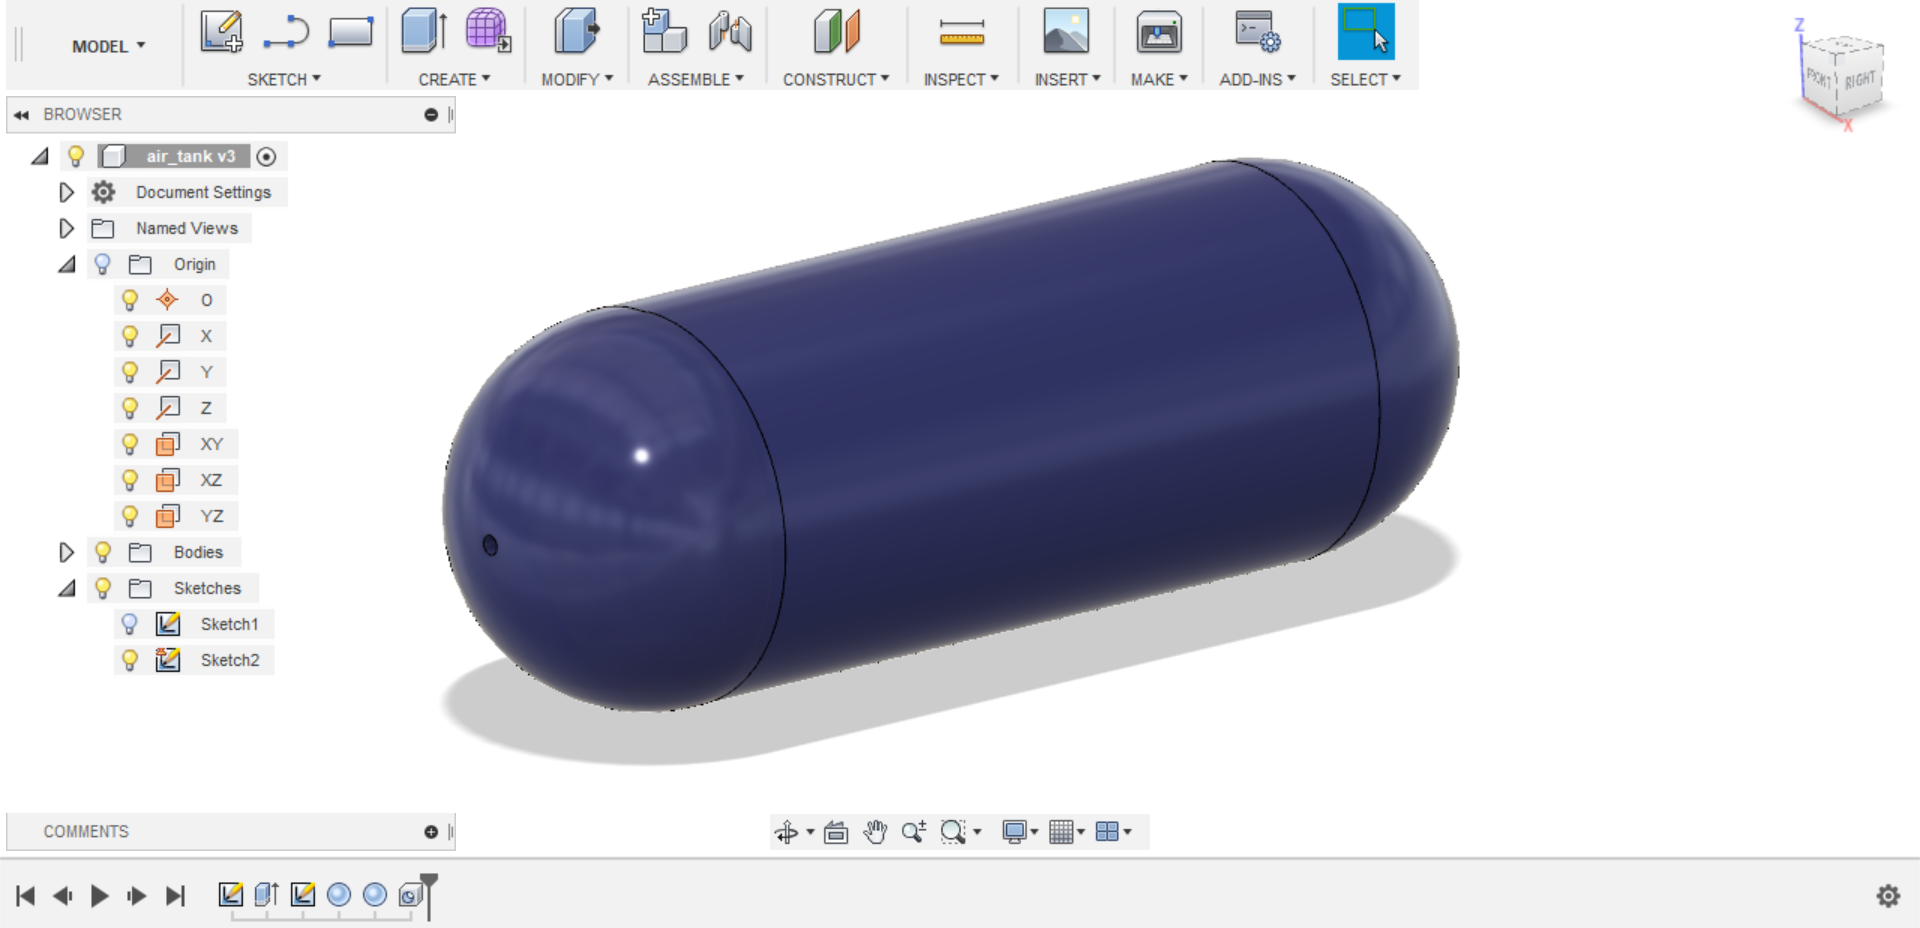
The hollow cylindrical section is simply a smaller circle within a larger circle, with the space between the circles extruded into the third dimension. The domes are simply two identical spheres placed on either end of the cylinder. Finally, a single hole was bored through the zenith of both spheres, creating an entry and exit point on opposite ends of the tank. This design should be easy to 3D print and can be mounted on the arm of the robot.
Air tanks act similar to capacitors in that they absorb “signal spikes,” the signal in this case being air pressure. If I find a more powerful air pump, or decide to couple multiple air pumps in tandem, it might not be a bad idea to attach a small air tank.